
If you’re renting a place, it’s important to keep your place as to how you want them to be. You’ll be living in them, so you’re free to do the modifications you need, of course, according to your agreement with your landlord. No matter how strict your landlord’s rules could be, there are ways to make your new place something you can call home.
DIY: How to Stain a Wood Door
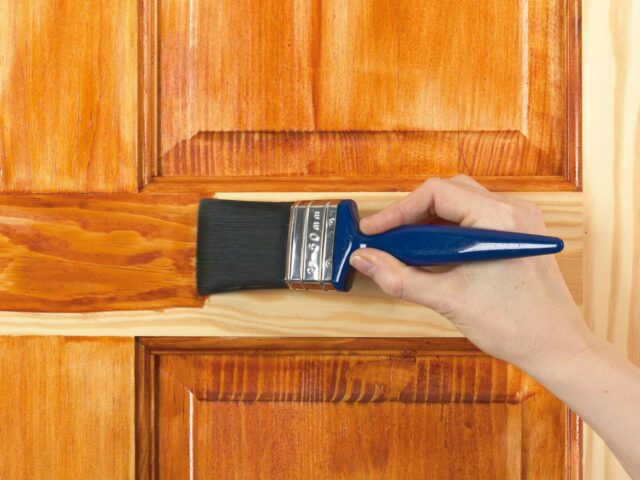
A stained door can look beautiful if it is done right. Whether using a dark mahogany stain or a light natural one, staining a wood door is quite simple. If you are doing it yourself, you will be happy to know that it can be done in 5 steps or less.
Materials you will need: wood conditioner (optional), stain, brushes, rags, topcoat.
All these materials can be found at a local paint store, hardware store, or home improvement store.
- Step 1: The first step is choosing a stain color. If you have scrap pieces of the exact wood you will be staining, bring them to the store and ask if they will put some stain samples on your wood. This will provide the most accurate idea of what the color will look like.
- Step 2: It may be easiest to set the door on 2 sawhorses. If the door you will be staining is already coated with a varnish, be sure to remove the varnish by sanding it off. You will want to be sure that the door is completely free of any signs of varnish, or the door will not take the stain in some areas and will look blotchy. After sanding, wipe the door down with a clean cloth or tack cloth.
- Step 3: Some species of wood do not take stains evenly. In these cases, a wood conditioner can be applied to the door. Check ahead of time whether the type of wood you are staining should be conditioned or not. Apply the wood conditioner and let it absorb for at least 15 minutes (but no longer than 2 hours).
- Step 4: Open your can of stain. Remember to stir it often, especially if it was tinted because the pigments will often settle at the bottom. You can either use a brush or a clean rag to apply the stain. Always work with the wood grain – never go against it. Let the stain sit on the door for the desired amount of time, then wipe it off with a clean rag. In most cases, the longer it sits, the darker the door will be. If it is not as dark as you would have liked, apply the 2nd coat. Once it has dried, flip the door over and stain the other side.
- Step 5: Wait the recommended amount of time (check the label on the can), then apply the topcoat with a good quality brush. Possible topcoats include water- or oil-based polyurethanes, spar-urethanes, or lacquers. The type of topcoat depends on whether it is an interior or exterior door. Let it dry. Lightly sand and apply a second coat.
Be aware, though, that these steps do not apply to fiberglass doors. Fiberglass doors should be stained using a gel stain, as they do not take regular stains very well.
If you follow these steps, you will not have a problem staining your wood doors. Staining a door is pretty easy. If you do it right the first time, you will end up with a beautifully-stained new door.
How to Remove Burn Marks on a Wood Vanity
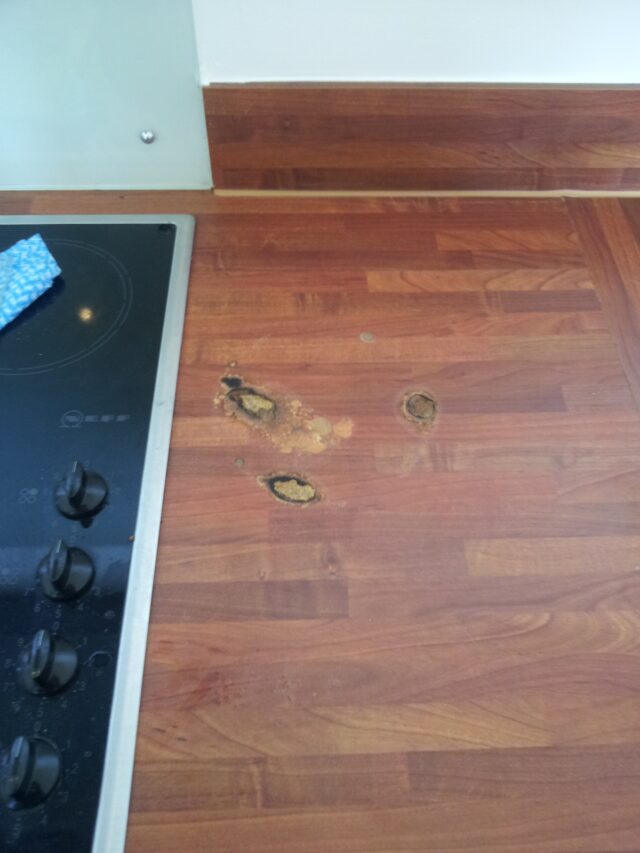
Discovering a burn mark on a wood vanity is a nightmare, especially when the home is rented. Careless smokers that put down their cigarettes for whatever reason or those that inadvertently touch surfaces with the lit end can cause a great deal of damage throughout the home. No matter how it happened, it is possible to remove burn marks on a wood vanity or cabinet. Even if it was deeply burned, it can be repaired without paying a professional.
Burns on the Wood Vanity and Floors in my Rented Home
I do not plan on repairing the burn marks on the bathroom vanity in my rented home. They existed before I leased the house, and I do not smoke nor do my guests. I cannot imagine how someone accidentally burned the wood vanity in the master bathroom, especially since the marks are on the front of a drawer. However, I know it had to be a careless smoker. The linoleum in the living room and both bathrooms have numerous burns, and I found a very way to cover them, although I did not have to. I could not stand the appearance of the ugly black spots.
Begin by Lightly Sanding the Wood
Sometimes burn marks on a wood vanity are not as deep as they appear, even if they are black. Begin by lightly sanding them. If the burn marks are small, try using an emery board, or place fine-grit sandpaper over the eraser end of a pencil. Carefully sand the wood, just inside the damaged areas. Be sure to sand in the direction of the grain of the wood, even if it is a very small area. This might remove the burn marks from the vanity. If it does not, sand a little harder. If they appear to go much deeper, try another easy method.
Use a Dremel Tool to Remove Deeper Burn Marks

When trying to remove deep burn marks from a wood vanity, use a Dremel tool with a sanding attachment. Grind out the burn marks with the smallest attachment necessary. The hole left behind can easily be filled and sanded. Wood filler is difficult to match with stain, but in any case, it will look far better than ugly black burns on a wood vanity.
Aside from these two things, you can get your hands dirty and learn to DIY some furniture yourself. It may be challenging at first, but with the right guide and a woodworking kit, you’ll be building wooden things in no time. If you have a kid, it’s a great bonding activity as well, allowing you to enjoy productive days while teaching your kid about woodworking. For a start, see some kits Sawinery reviewed, to find what would match your kid. Afterward, you’re off to a DIY journey while making your home as comfy and cozy as it should be.
You can find more tips for renovating and maintaining your home, as well as reviews of the tools you need from bestazy reviews.


