
Is your PC showing a nv4_disp.dll file error? If yes, then you have come to the right place. In this post, we will tell you how to resolve the issue by following simple steps.
The Nv4_disp.dll is related to Nvidia graphics card drivers. It is used to boost the performance of Nvidia components.
A new update was released by Nvidia in 2010, which caused some users to experience a particular file error. Although Nvidia has not released any solution to the issue, it can be resolved by replacing the DLL file manually.
If you want to know more about the nv4_disp.dll file error and the solution to fix it, then you should give this article a read.
What causes the nv4_disp.dll file error?
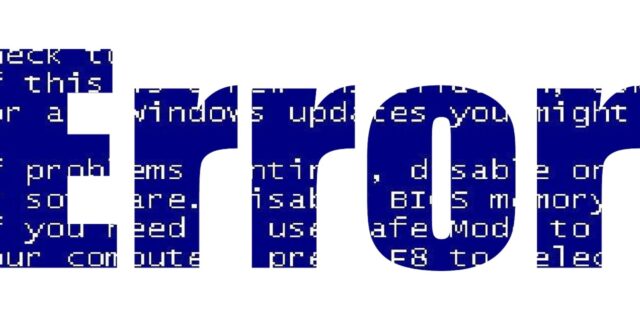
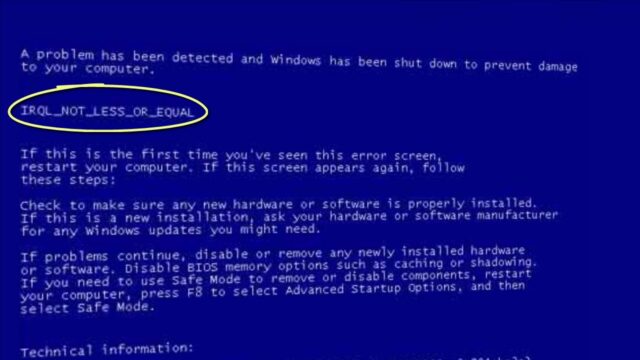
To resolve the issue, you need to first know what causes it. This error usually results in a blue screen, containing the error message “Nv4_disp.dll”.
The blue screen is shown because the error prevents Windows from using the NVidia graphics adapter that is installed on your computer. The error mainly occurs when the hardware and driver of your computer cause a conflict. This causes the driver to run in an infinite loop. This loop makes Windows unusable and therefore, you get to see the blue screen error.
This error is experienced by many users from the time, the new update has been launched by Nvidia. However, the company didn’t release any solution for it. The fix we are going to discuss is developed by the Nvidia community. With the help of this solution, you can prevent this error from occurring again. That being said, let’s walk you through the details.
How to fix the nv4_disp.dll file error?

The best way to fix this error is to replace the nv4_disp.dll file manually from your system. We have laid down the steps in detail. Even if you are not a techie, you should be able to follow it easily.
Here is what you have to do:
- The first thing you need to do is get the nv4_disp.dll file online from dllinstaller.com.
- Make sure that you download the DLL file in the zip file, and then unzip it.
- Now follow the path c:\Windows\System32.
- Locate the current nv4_disp.dll file in your system and rename this one to nv4_dispBACKUP.dll. You may need this for further use.
- Once you are done renaming it, copy & paste the downloaded nv4_disp.dll file into C:\Windows\System32.
- Click the Start option and then click Run. Now type “cmd” to open the command prompt.
- You need to type “regsvr32 nv4_disp.dll” and then press the enter key on your keyboard.
- Once you are done with the above-mentioned steps, you can restart your computer.
This method should solve the nv4_disp.dll error from your PC. However, this method could feel difficult for many users as you have to download the nv4_disp.dll from the internet. But if you follow all the steps without making any mistakes, then you should be good to go.
Other Methods To Solve The nv4_disp.dll File Error
If you find the above-mentioned method hard to follow, no worries because there are other ways you can try. We have laid down yet another popular solution that you can use to resolve the error. The last step of this method is the same as the method mentioned above.
Here is what you need to do:
1. Restart Your Computer into “Safe Mode With Networking”

The NV4_Disp.dll error could also cause your Windows to crash at boot. This is why it recommended you reboot your computer into “Safe Mode With Networking”.
This will load Windows into a mode whereby all the software and drivers will not be loaded. This makes it easier for you to edit your drivers without letting your system crash.
- At first, you need to restart your computer.
- Now press the F8 button continually before Windows get the chance to load.
- Using the arrows on your keyboard, choose the “Safe Mode With Networking” option.
2. Reinstall The NVidia Driver On Your Computer
Once you have loaded your system into Safe Mode, you don’t have to worry about it crashing. This means you can now reinstall the NVidia driver, to resolve the error.
- Click on the Start option and then go to the Control Panel and then to Add / Remove Programs.
- Find the NVidia graphics driver listings.
- Click on the option “Remove” or “Uninstall”.
- You need to proceed with the uninstaller.
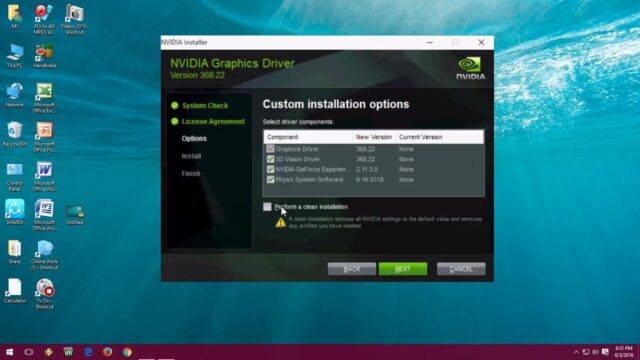
3. Download And Install The Latest Nvidia Driver
After you remove the NVidia driver from your PC, you need to reinstall it again.
- Download the latest Nvidia drivers from the official website.
- Now save the installer to your hard drive and load it up.
- Allow the installation process to get completed.
- Once done, restart into normal mode to see it worked or not.
4. Replace The NV4_Disp.dll File
Replacing the nv4_disp.dll file from your system would be the best way to solve the error.
- Download the nv4_disp.zip from the net.
- Unzip the nv4_disp.dll file onto your system’s hard drive.
- Now download the DLL Repair Tool and browse to c:\Windows\System32.
- Find the current nv4_disp.dll on your computer and rename the current nv4_disp.dll to nv4_dispBACKUP.dll.
- Copy & paste the new nv4_disp.dll into C:\Windows\System32.
- Click the Start option and then click Run. Type “cmd” in the given box.
- Enter “regsvr32 nv4_disp.dll” on the black screen and hit the enter button.
5. Clean Out The Registry

Another cause of the nv4_disp.dll error is the windows registry database which stores all the information, settings, and options for your PC. There are times when a lot of registry settings get corrupted which slows your PC. To fix this problem, you need to use a ‘registry cleaner’ to scan through your computer and fix all the damaged settings.
Fixing the nv4_disp.dll error could be an easy task if you know the right steps. With the help of the solution mentioned, you should be able to solve the error in no time.


