M.2 SSDs are gaining popularity as a fast, efficient storage option for laptops and computers. Installing one is a relatively straightforward process that requires basic technical knowledge and some simple tools. With just a few steps, you can get your system up and running with the extra performance boost of an M.2 SSD in no time!
How to Upgrade Your System with an M.2 SSD?
Upgrading your system with an M.2 SSD can be a great way to improve performance while still keeping costs under control. By replacing your existing hard drive or SATA-based SSD with a newer, faster model, you’ll see an instant boost in speed that makes everything from opening applications to loading websites significantly faster.
Prepare Your System
Before attempting the upgrade, it’s important to make sure that your system is well-prepped ahead of time; this includes backing up all important data and installing the right drivers for your specific hardware/motherboard combination. Taking the time to do this will help ensure that the installation goes smoothly and further decreases the chances of any potential hiccups later down the line.
Install Your Drive
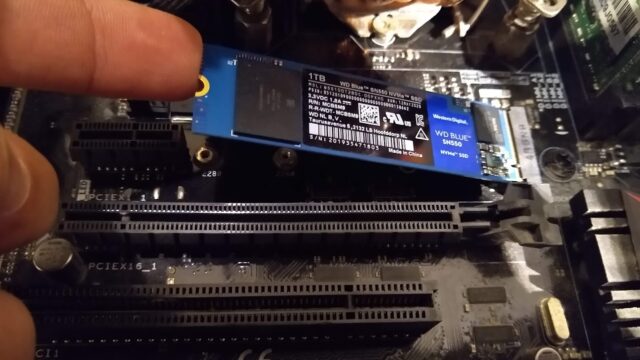
Source: pcworld.com
Once everything is ready, you can now start the process of installing your new drive; most motherboards feature dedicated M.2 slots (usually at least one) which should provide enough space for standard-sized drives – but if not, then you may need to purchase an adapter or carrier in order to fit larger ones without issue.
Configure It Properly
The last step is configuring your drive properly: ensuring that power and data cables are connected correctly, applying any necessary firmware updates (if supported), and formatting/partitioning it according to your needs are all crucial tasks in making sure that your new drive runs optimally upon completion.
Step 1: Gather Your Tools and Materials
Before you begin the installation process, make sure that you have all of the necessary tools and materials on hand. You will need:
A Phillips head screwdriver
An M.2 SSD drive
ESD (Electrostatic Discharge) protection (e.g., wrist strap or grounding mat)
Thermal paste (if your motherboard does not include thermal pads)
Step 2: Shut Down Your System & Remove the Power Cables
The first step to installing an M.2 SSD is to shut down your computer completely, including any connected peripherals such as external hard drives or displays. After it has been powered down, remove any power cables from both the computer itself and any peripherals connected to it. This will help ensure that there is no chance of electric shock during installation or operation afterward.
Step 3: Open Up Your Computer Case
To access the internal components of your system, you will need to open up the computer case. Depending on what type of chassis you have, this can involve unscrewing several screws located around its edges or releasing two or more latches located at different points on its exterior walls.
Be sure to keep track of where each screw goes so that when it comes time to reassemble everything, you know where each belongs! Once opened up, take note of exactly where the M.2 slot is on the motherboard so that you know where to insert the new drive when ready.
Step 4: Physically Install The Drive
Now comes the time for actually mounting your new hardware – simply line up the drive’s notches with those of your motherboard’s slot and gently push it in until it snaps into place firmly but comfortably – be careful not to press too hard here!
If necessary, use a Phillips head screwdriver to secure the drive by putting one screw at either end; this will help keep it from wiggling loose over time due to vibrations while in use (which could damage both components). If using thermal pads as insulation instead of paste, skip ahead past this step below).
Step 5: Apply Thermal Paste (if Necessary)
If thermal paste is required for insulation between the CPU die and heat spreader on your motherboard in order for optimal operation, then now would be an appropriate time to apply it before powering up your system again – consult your manual instructions if unsure about how much or what type should be used here!
Simply dispense a small amount onto a cloth or paper towel before dabbing it onto both surfaces mentioned above; usually, only a very thin layer is needed for effective insulation purposes so don’t go overboard with too thick here!
Step 6: Reconnect All Wires & Plug-In in Ready To Go!
Once all components are installed correctly – including any necessary thermal pads/paste – simply reconnect all wires back into their respective spots on both sides of the computer case before plugging in power cables back into their proper sockets as well (powering from mains outlet). Once these steps are completed successfully, all that’s left now is booting back up one final time – enjoy!
Common Issues When Installing an M.2 SSD
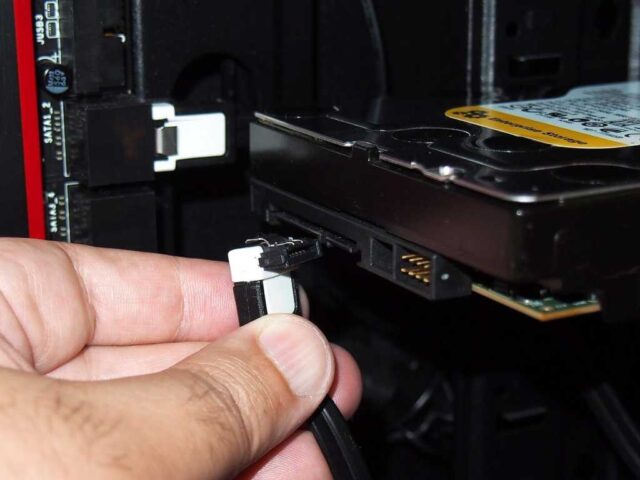
Source: groovypost.com
Installing an M.2 SSD is a relatively straightforward process, but there are a few common issues that can arise if the job isn’t done properly. Knowing what to look out for and how to fix them can help ensure that you install your drive as quickly, easily, and safely as possible.
Wrong Type of Slot
One of the potential problems you may run into when installing an M.2 SSD is using the wrong type of slot on your motherboard. Almost all motherboards have multiple types of slots – SATA and PCIe for example – so make sure you check which one your new drive requires before proceeding with the installation. If installed in the wrong type, it will not be able to communicate properly with the rest of your system and won’t be recognized at all once powered up.
Incorrectly Connected Power & Data Cables
If you’re upgrading from a traditional SATA hard drive to an M.2 SSD, chances are you’ll need to replace some or all of your data cables along with it; the two connectors aren’t compatible so don’t try plugging them together! Be sure to refer to your computer’s manual or consult a professional in order to ensure that they are connected correctly – this is especially important since improperly installed power or data cables can cause hardware damage if left unchecked!
Not Enough Clearance For Cooling
Another potential problem that might come up during installation is not having enough clearance for cooling – something which is especially important considering the higher speeds and better performance an M.2 SSD can offer over traditional storage solutions like HDDs or even other forms of SSDs (namely 2.5″ SATA drives). Make sure that there’s room between any other components around where you plan on mounting your drive (including things such as GPUs) and check their temperatures periodically afterward just in case anything starts getting too hot!
Choosing the Right M.2 SSD for Your System
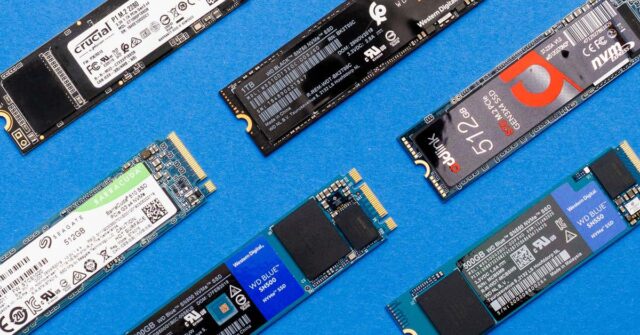
Source: nytimes.com
Choosing the right M.2 SSD for your system can be a daunting task, but it doesn’t have to be. Knowing what features and specifications to look for will help you make an informed decision so that you get the most out of your investment.
Storage Capacity
The first thing to consider is storage capacity – how much space do you need and how much can you realistically afford? It’s usually best to go higher than what you think you’ll need because there’s always the potential for growth later down the line; with M.2 SSDs in particular, getting enough storage capacity right off the bat means no added cost or inconvenience when upgrading in the future.
Read & Write Speeds
Another key factor to take into account is read and write speeds; these are major contributors to overall performance and can vary greatly between models. As such, it pays off to pay close attention to benchmarks as they can give a good indication of which ones offer better bang-for-your-buck value.
Price vs Performance
Of course, the price also plays a role in deciding which one is best for your needs and budget; when shopping around for M.2 SSDs, make sure to check not only their list prices but also reviews from other users regarding their reliability and performance over time in order to get an accurate assessment of which models offer quality builds at reasonable prices!
Conclusion
Installing an M.2 SSD can be a great way to expand the storage of your computer and improve its performance. While the process can seem daunting at first, with the right tools and guidance, it is quite easy and straightforward. Therefore, there’s no need to be intimidated – all you have to do is to follow the instruction step-by-step and take extra caution when handling hardware components. Good luck!